20 Inspiring Chalk Art Ideas

Chalk art has transformed from a nostalgic childhood pastime into an breathtaking medium for modern decor, community events, custom event signs, and expressive public art. Whether you are transforming a cozy kitchen chalkboard wall, designing a welcoming sidewalk masterpiece, or personalizing home accessories, chalk art brings dynamic texture and temporary elegance to any space. Below are 20 creative, highly detailed chalk art ideas along with everything you need to recreate them yourself.

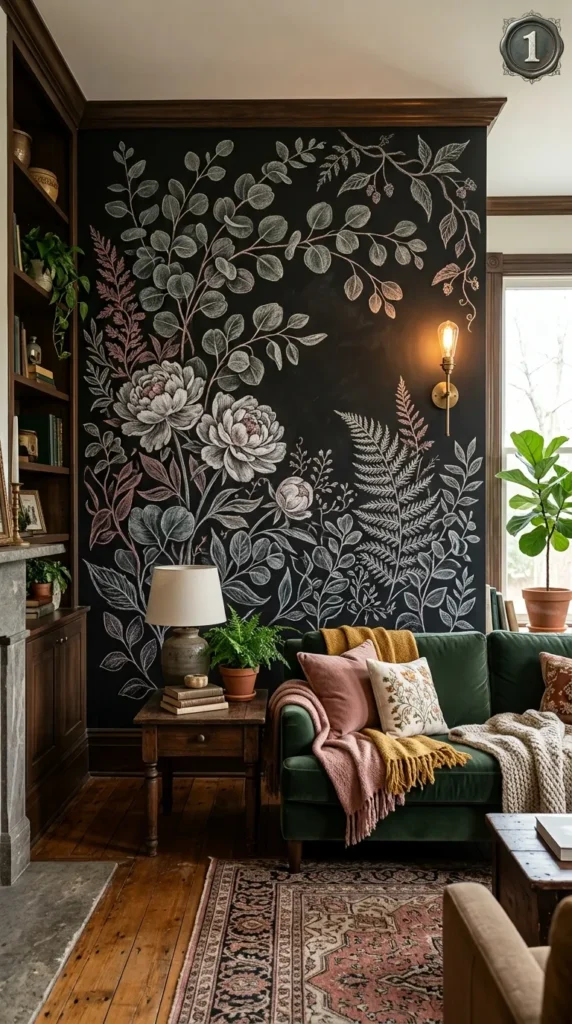
1. Botanical Meadow Blackboard Wall

Introduction

A lush, botanical chalk drawing transforms an ordinary black accent wall into a sprawling, realistic nature sanctuary. This design brings outdoor tranquility inside, using layered greens and delicate floral line work to create dramatic visual contrast against dark backgrounds.

What This Idea Means

This idea centers on creating an architectural focal point using realistic flora—such as eucalyptus branches, blooming peonies, and delicate ferns—drawn directly onto a interior wall to ground a room in natural beauty.

How to Make It

  • Prepare the Surface: Clean the chalkboard wall thoroughly with a damp cloth and prime it by rubbing the side of a piece of chalk over the entire surface, then wiping it away.
  • Sketch the Framework: Lightly sketch the main stems and overarching vines using a light grey chalk pencil to establish balance.
  • Add Foreground Elements: Draw large focal flowers like roses or peonies first, shading petals with soft circular motions using liquid chalk pens for sharp lines.
  • Layer Leaves & Tendrils: Fill in surrounding foliage with varying thicknesses of chalk lines, layering lighter leaves over darker smudged backgrounds to create depth.

Tips and Variations

  • Use a damp cotton swab to erase minor stray lines and sharpen leaf tips.
  • Try a minimalist monochrome look using only white chalk, or introduce subtle pastel greens and dusty pinks for a botanical watercolor effect.

Materials Needed

  • Chalkboard paint wall or large board
  • Standard white and pastel chalk sticks
  • Fine-tip white and green liquid chalk markers
  • Cotton swabs and microfiber cloth

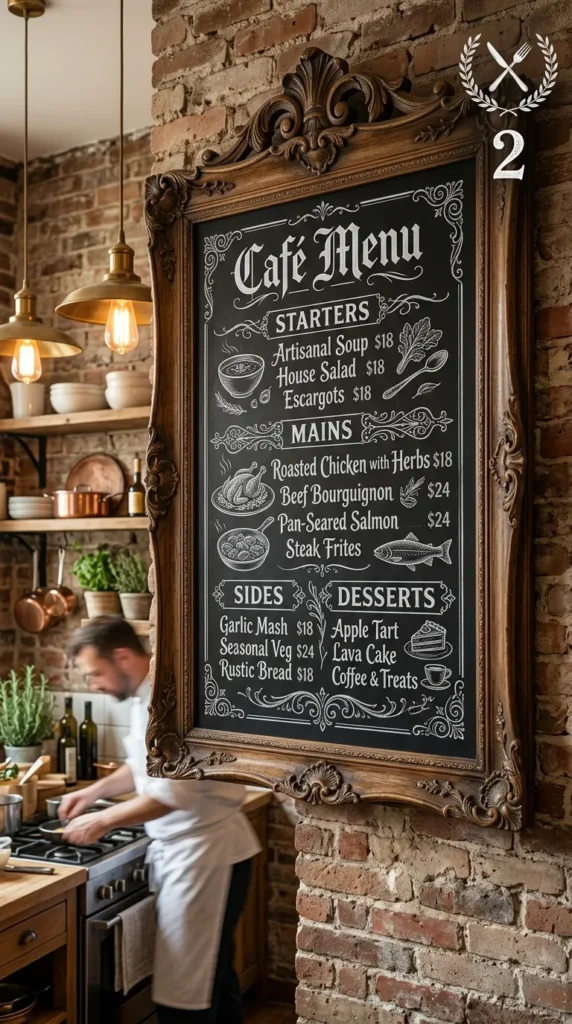
2. Vintage Typographic Kitchen Menu Board

Introduction

Bring the rustic charm of a European bistro into your dining room or kitchen. A vintage typographic menu board turns daily meals, coffee station recipes, or weekly routines into a stylish centerpiece.

What This Idea Means

This concept combines classic hand-lettering styles—such as serif, script, and block letters—with ornate flourishes, banners, and borders to create a functional, decorative display.

How to Make It

  • Grid and Guide Lines: Use a ruler and chalk line to draw faint horizontal guidelines across your board to keep your text straight.
  • Draft the Layout: Block out major headings (like “Café,” “Menu,” or “Kitchen”) in large script, leaving plenty of spacing between sections.
  • Incorporate Ornate Flourishes: Add vintage scrollwork, banners around dates, and decorative dividers between menu items.
  • Fill and Shade: Use liquid chalk markers for dense, solid lettering, then shade the left sides of letters with standard chalk to mimic a 3D drop-shadow effect.

Tips and Variations

  • Mix fonts deliberately: pair a tall, bold sans-serif with a fluid, sweeping calligraphy script for contrast.
  • Swap food items seasonally, adding autumn wreath borders in October or citrus accents in summer.

Materials Needed

  • Framed wood-rimmed chalkboard
  • Precision ruler or t-square
  • White liquid chalk markers (various tip sizes)
  • Regular white chalk stick (for drop shadows)

3. 3D Optical Illusion Sidewalk Art

Introduction

Sidewalk chalk art elevates ordinary concrete into interactive masterpieces. A 3D optical illusion draws onlookers in, inviting them to pose and step into an alternate reality directly beneath their feet.

What This Idea Means

Using forced perspective (anamorphosis), this technique stretches images so that when viewed from a specific angle or camera lens, the flat surface appears to drop down into a canyon, float into the sky, or open a hidden doorway.

How to Make It

  • Establish the Viewing Point: Mark the exact spot where the observer or photographer will stand.
  • Grid the Surface: Lay out a grid on paper and replicate a stretched version of that grid on the pavement using string and chalk.
  • Outline the Distortion: Draw the elongated shapes—such as a deep wooden suspension bridge over an abyss—stretching lines outward toward the horizon.
  • Apply Heavy Shading: Use dark charcoal and deep blue pastels for deep shadows, and stark white highlights on edges to exaggerate depth.

Tips and Variations

  • Take photos periodically from the designated camera point while drawing to ensure the perspective works visually.
  • Great themes include a lily-pad pond, a subterranean crystal cave, or a floating geometric platform.

Materials Needed

  • Soft sidewalk chalks and outdoor chalk pastels
  • Blending sponges and soft-bristle brushes
  • Masonry string line and tape measure

4. Solar Eclipse Cosmic Galaxy Board

Introduction

Unleash the wonders of the night sky indoors. A galaxy chalk board combines deep swirling color blends, brilliant stars, and celestial orbits for an ethereal room accent.

What This Idea Means

This idea captures the movement of outer space—nebulas, planetary rings, and constellations—using blended chalk powders against a deep black canvas.

How to Make It

  • Create Color Dust: Scrape bright purple, cyan, magenta, and white chalk sticks with a craft knife to produce fine colored chalk dust.
  • Blend the Nebula Base: Rub the dust into the board using cotton balls or soft makeup sponges, creating flowing spiral galaxy arms.
  • Draw Celestial Bodies: Use a compass or circular template to draw sharp planets and a central glowing solar eclipse.
  • Flick Starlight: Wet a toothbrush, rub it against white chalk stick tips, and gently flick the bristles to create a cluster of tiny stars across the board.

Tips and Variations

  • Highlight actual astronomical constellations and label them with fine script for an educational twist.
  • Spray lightly with a temporary chalk sealant if you want to keep the dust from smudging.

Materials Needed

  • Smooth black chalk panel
  • Soft pastel chalks (cyan, magenta, violet, white)
  • Makeup sponges and toothbrush
  • Circle drafting templates

5. Architectural Monochromatic City Skyline

Introduction

Capture the bustling energy of urban design with an elegant, architecturally accurate cityscape. This clean, geometric approach works wonderfully in modern living rooms or home offices.

What This Idea Means

A sleek vector-style depiction of iconic skyscrapers, bridges, and classic facades rendered purely in sharp white and grey lines against a matte dark surface.

How to Make It

  • Reference Line: Draw a straight horizon line across the lower third of the board.
  • Block Out Structure: Outline various skyscraper silhouettes using a straightedge ruler, alternating heights and roof styles (gables, spires, flat towers).
  • Detail Windows and Facades: Use ultra-fine tip liquid chalk markers to draw uniform grids of windows, suspension cables, and structural beams.
  • Add Reflection Effects: Below the horizon line, smudge soft horizontal white strokes to mimic water reflections in a bay or river.

Tips and Variations

  • Choose a specific favorite city—like Paris, Tokyo, or New York—and highlight recognizable landmarks.
  • Keep the design strictly linear without smudging for a minimalist blueprints feel.

Materials Needed

  • Large black chalk canvas
  • Fine and extra-fine white liquid chalk pens
  • Acrylic straightedge ruler and set-square

6. Whimsical Nursery Moon & Clouds Photo Backdrop

Introduction

Create a magical interactive photo wall for nurseries, baby showers, or children’s bedrooms with soft, cloud-filled night skies and a crescent moon seating area.

What This Idea Means

A large-scale wall installation featuring dreamy, hand-drawn elements designed specifically to serve as a whimsical background for family portraits and milestone photos.

How to Make It

  • Center the Focal Point: Draw a giant, stylized crescent moon in the middle of the wall, wide enough to frame a sitting child or chair.
  • Layer Fluffy Clouds: Draw overlapping cloud contours below and around the moon using soft, rounded strokes.
  • Blend Texture: Use your palm or a dry microfiber cloth to blend the centers of the clouds into a soft, hazy white glow.
  • Accents: Hang light chalk-drawn stars from “strings” connected to the top of the frame.

Tips and Variations

  • Add cute woodland animals sitting atop the moon or sleeping inside cloud clusters.
  • Use soft gold or warm yellow chalk for the moon to give it a cozy glow.

Materials Needed

  • Full-sized chalkboard wall or large board
  • White and warm yellow soft chalk sticks
  • Microfiber blending cloth

7. Seasonal Pumpkin & Autumn Leaf Wreath

Introduction

Celebrate the warmth of fall with an elaborate, circular wreath design bursting with pumpkins, acorns, oak leaves, and warm autumnal lettering.

What This Idea Means

A seasonal doorstep or entryway statement piece that incorporates warm fall tones and natural motifs framed inside a classical wreath layout.

How to Make It

  • Trace the Guide Circle: Lightly trace a large circular template (like a bicycle wheel or large tray) in the center of the board.
  • Build the Foliage: Layer leaves (maple, oak, eucalyptus) around the circular line, pointing them in a continuous clockwise orientation.
  • Add Focal Elements: Draw small ribbed pumpkins, pinecones, and clusters of berries nestled along the bottom curve of the wreath.
  • Add Seasonal Text: Write a warm greeting such as “Hello Fall” or “Grateful Heart” inside the empty center circle.

Tips and Variations

  • Apply orange, deep yellow, and burnt sienna chalks, blending them together where leaves meet.
  • Swap the fall motif for holly, pine branches, and ornaments when winter arrives.

Materials Needed

  • Round or rectangular chalkboard sign
  • Colored chalk pack (orange, yellow, brown, white)
  • Circular tracing guide

8. Intricate Geometric Mandala

Introduction

Mandala chalk art brings balance, symmetry, and calming visual rhythms to any space. Drawing mandalas is a meditative process that produces stunning geometric masterpieces.

What This Idea Means

A centered, radial pattern composed of repeating concentric circles, floral petals, triangles, and intricate lace-like flourishes.

How to Make It

  • Mark Center & Axis: Find the exact center of the board. Draw faint horizontal, vertical, and diagonal axis lines passing through it.
  • Draw Concentric Circles: Use a chalk compass to draw 5 to 10 concentric circles expanding outward from the center point.
  • Fill Inner Layers: Begin from the center circle, drawing repeating petal or teardrop shapes inside the first ring.
  • Mirror Outward: Move to each outer ring, repeating identical patterns along every axis line to ensure full symmetry across 360 degrees.

Tips and Variations

  • Keep the line work razor-sharp using liquid chalk markers for a modern mandala look.
  • Smudge soft colored backgrounds inside selected rings before drawing white line details over them.

Materials Needed

  • Chalkboard canvas
  • Chalk compass and protractor
  • White liquid chalk pens

9. Vibrant Tropical Floral Door Frame Accent

Introduction

Frame an entryway, doorway, or mirror with a vivid border of tropical leaves and exotic blossoms, bringing tropical warmth into home interiors.

What This Idea Means

A decorative, architectural chalk border design featuring oversized monstera leaves, palm fronds, hibiscus flowers, and trailing vines that trace the outer edge of a doorway.

How to Make It

  • Map the Border: Clean the wall surface directly surrounding a door frame or mirror.
  • Draft Large Foliage: Draw large monstera leaf cutouts and fan-like palm fronds anchoring the top corners of the frame.
  • Incorporate Exotic Flowers: Nestling bright hibiscus or plumeria blooms near the leaf junctions to break up green areas.
  • Connect with Vines: Extend delicate curling vines and smaller tendrils down the vertical edges of the door frame.

Tips and Variations

  • Work with rich emerald green, bright turquoise, and hot pink chalk pastels for maximum visual pop.
  • Use a damp cloth to clean up any dust along the trim lines of the door casing.

Materials Needed

  • Chalkboard paint around door frame
  • Tropical colored chalk pastels
  • Detail blending stipple brush

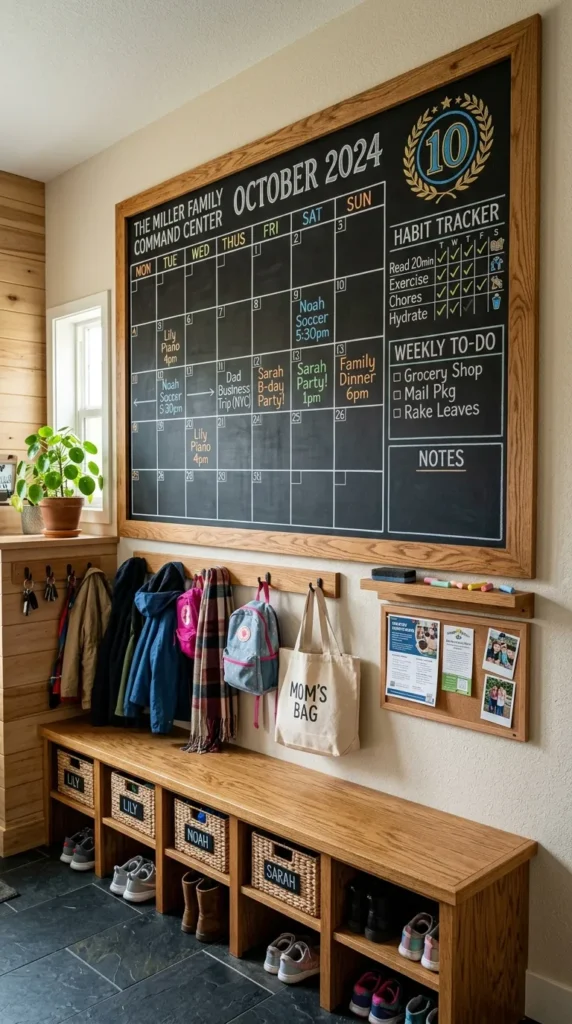
10. Chalkboard Calendar & Family Command Center

Introduction

Combine high-end aesthetic design with everyday home organization by building an interactive, reusable monthly calendar board for the whole family.

What This Idea Means

A structured grid system framed with chic hand-lettered headers, habit trackers, and grocery lists that stays clean and easy to update month after month.

How to Make It

  • Permanent Grid Lines: Draw the calendar grid lines using a white acrylic paint pen or permanent liquid chalk pen so it won’t erase during monthly wipes.
  • Header Lettering: Create elegant calligraphy headers for “MONTH,” “TO-DO,” and “NOTES” along the top and side margins.
  • Fill Monthly Dates: Use soft chalk sticks to fill in the days, dates, and schedules, making them easy to wipe away at the end of the month.
  • Add Color-Coded Accents: Assign different colored chalks to each family member or activity type (work, school, fitness).

Tips and Variations

  • Add a magnetic chalk board surface to hold sticky notes and mail clips alongside your chalk schedule.
  • Keep small doodle boxes at the bottom for kids to draw their own daily weather reports.

Materials Needed

  • Large wall-mounted chalkboard
  • Permanent white chalk marker (for grid)
  • Multi-colored washable chalk sticks
  • Straightedge ruler

11. Retro Neon Café Coffee Cup

Introduction

A glowing, nostalgic coffee illustration that captures the fun visual energy of mid-century diner neon signs on a dark blackboard background.

What This Idea Means

Using bright neon-colored chalks and double-line drawing techniques to recreate the appearance of illuminated gas-tube neon signs depicting a steaming cup of coffee.

How to Make It

  • Outline Design: Lightly sketch a stylized coffee cup, saucer, and rising steam ribbons.
  • Double-Line Technique: Trace all main lines with double parallel strokes using bright neon chalks (pink, cyan, bright yellow).
  • Create Core Glow: Draw a bright, sharp white line straight down the middle of the colored gap to give the illusion of a glowing tube center.
  • Add Ambient Glow: Gently smudge the outer edges of the colored chalk outward into the dark background using a dry cotton swab.

Tips and Variations

  • Add glowing neon typography above the cup with phrases like “Fresh Brew” or “But First, Coffee.”
  • Keep background elements dark to maximize the glowing optical illusion.

Materials Needed

  • Matte black chalkboard
  • Electric neon chalk sticks (pink, cyan, orange)
  • White detail chalk pen
  • Cotton swabs

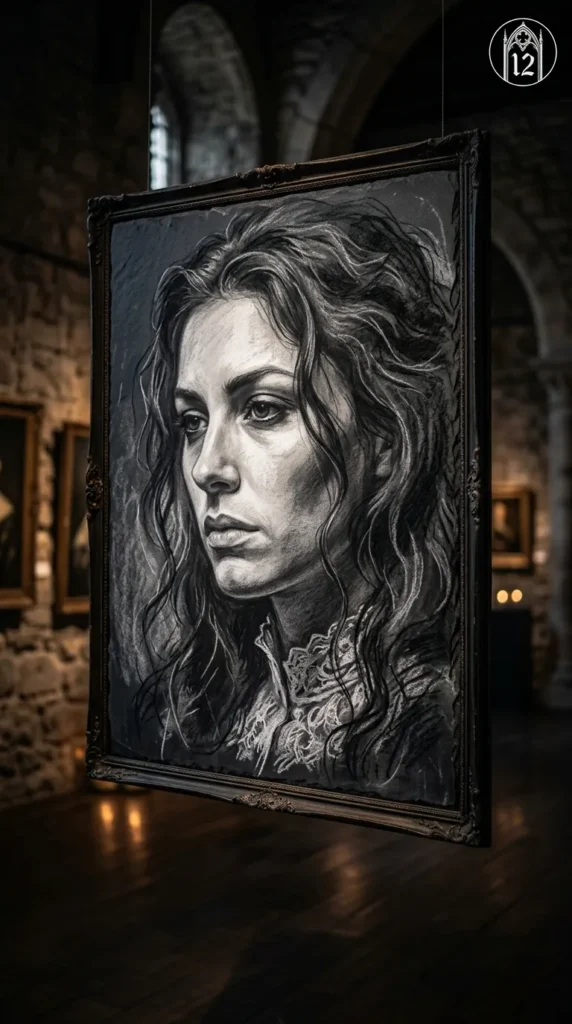
12. Chalk Art Portrait & Silhouette

Introduction

Chalk portraits offer dramatic value contrast, creating moody, artistic depictions of human faces, historic figures, or sleek silhouettes using light and shadow.

What This Idea Means

A fine art drawing technique where light surfaces and highlights are built up from a dark canvas, rather than shading dark values onto white paper.

How to Make It

  • Block Out Silhouette: Shade the entire background outside the subject dark, or block the subject’s outline in solid white light.
  • Map Highlights: Identify primary light sources and apply soft white chalk onto cheekbones, nose bridges, hair contours, and collar lines.
  • Midtone Blending: Feather white highlights outward using your ring finger to create smooth skin transitions and gentle gradations.
  • Sharpen Edges: Use charcoal chalk sticks to cut back into the light areas, establishing deep shadows and sharp contrast.

Tips and Variations

  • Focus on high-contrast black-and-white portraits for dramatic theatrical impact.
  • Try drawing beloved family pets or iconic cultural figures.

Materials Needed

  • High-density smooth chalk panel
  • Soft white chalk stick & black charcoal stick
  • Blending chamois or fingertips

13. Nautical Maritime Compass & Kraken Map

Introduction

Embark on a high-seas adventure with an antique-style nautical map featuring vintage compass roses, sea monsters, and sweeping waves.

What This Idea Means

A vintage cartography illustration rendered in rustic chalk lines, bringing historical adventure and old-world charm to study rooms or game lounges.

How to Make It

  • Draw Compass Rose: Construct an 8-pointed central star using intersecting diagonal lines and clean triangular shading.
  • Map Coastlines: Outline aged, jagged island coasts and continents around the edges of the board.
  • Incorporate Mythical Creatures: Sketch a detailed Kraken octopus emerging from ocean wave lines with curling tentacles.
  • Add Map Details: Fill open ocean spaces with wind lines, sailing ships, and latitude degree grids.

Tips and Variations

  • Use sepia, cream, and faint white chalks to give the board an authentic parchment-paper feel.
  • Add a banner across the top featuring classic sea quotes or family crests.

Materials Needed

  • Large wood-framed chalkboard
  • Cream and white fine-tip chalk markers
  • Protractor and straightedge

14. Motivational Typography Board

Introduction

Daily inspiration meets creative design with bold, beautifully structured motivational typography walls for home gyms, offices, or hallways.

What This Idea Means

Arranging a powerful quote into a balanced visual composition where key words are emphasized with distinct letterforms, banners, and decorative framing.

How to Make It

  • Deconstruct the Quote: Group your quote into lines, identifying the 2-3 key words that need to be largest.
  • Create Layout Blocks: Draw geometric bounding boxes on the board for each word to ensure the quote fills the space harmoniously.
  • Vary Type Styles: Use bold block letters for punchy words, floating script for connecting words, and shadowed slab serifs for the main emphasis.
  • Add Decorative Accents: Surround the text block with laurels, arrows, starbursts, or geometric frames to lock the composition together.

Tips and Variations

  • Change the quote every month to stay fresh and inspired.
  • Use liquid chalk pens for sharp, easy-to-read lettering that stays clear from across the room.

Materials Needed

  • Framed chalkboard sign
  • White liquid chalk markers (chisel and bullet tips)
  • Erasable chalk pencil for drafting

15. Realistic Chalk Butterfly & Floral Collage

Introduction

Bring vibrant garden energy indoors with realistic, multi-colored butterflies hovering around soft, blooming garden flowers.

What This Idea Means

A colorful, delicate illustration emphasizing soft blending, vivid color gradients, and realistic wing patterns to produce a vibrant wildlife scene.

How to Make It

  • Outline Wings: Draw symmetry-guided wing outlines for monarchs, swallowtails, or blue morpho butterflies.
  • Apply Base Colors: Fill the wing panels with rich base colors—bright orange, deep blue, or warm violet chalk pastels.
  • Add Wing Veins: Overlay delicate black charcoal veins and outer border patterns directly over the colored backgrounds.
  • Incorporate Flowers: Draw soft daisy, lavender, or sunflower petals underneath the butterflies, using blended chalk pastels.

Tips and Variations

  • Dust small specks of white chalk around the butterflies to look like floating pollen catching light.
  • Create a floating 3D effect by drawing tiny drop shadows on the board surface right underneath the butterfly wings.

Materials Needed

  • Smooth black chalkboard
  • Rich pastel chalk set (orange, blue, yellow, white)
  • Charcoal detail pencil
  • Smudge tortillons

16. Rustic Wedding Welcome Sign

Introduction

Greet guests with timeless elegance using a customized rustic chalk wedding sign decorated with delicate floral wreaths and sweeping calligraphy.

What This Idea Means

An elegant, professional-grade sign designed for special events, blending graceful script lettering with classic floral motifs to set a welcoming tone.

How to Make It

  • Center Lettering: Lightly sketch the couples’ names in grand copperplate or modern brush script right in the center.
  • Sub-Text Layout: Add smaller, clean sans-serif text below for the date, location, and welcome message.
  • Frame with Botanicals: Add delicate greenery branches along top and bottom corners, framing the text gracefully without crowding it.
  • Seal Details: Clean up all edges using a damp detail swab to leave pristine dark space around every letter.

Tips and Variations

  • Use permanent chalk markers if the sign will be displayed outdoors during breezes or humidity.
  • Adapt the sign for birthdays, baby showers, or anniversary celebrations.

Materials Needed

  • Vintage dark wood-framed chalkboard
  • Extra-fine white liquid chalk pen
  • Microfiber cloth and cotton swabs

17. Interactive Educational Solar System

Introduction

Make science visually exciting with a sprawling, interactive solar system map perfect for kids’ bedrooms, playrooms, or classrooms.

What This Idea Means

An educational chalk art project depicting the sun, planets, asteroid belts, and orbits in vibrant color, complete with fun facts and labels.

How to Make It

  • Draw Orbital Paths: Sweep wide, curved white chalk lines across the board radiating from a large glowing sun on one side.
  • Render Planets: Draw each planet along its orbit path, accurately capturing key characteristics (Jupiter’s red spot, Saturn’s rings, Earth’s continents).
  • Color and Texture: Blend soft chalks to recreate atmospheric swirls on gas giants and crater textures on moons.
  • Add Labels & Facts: Write neat labels, moon counts, and distance numbers next to each celestial body.

Tips and Variations

  • Use glow-in-the-dark chalk accents for extra fun during bedtime!
  • Leave blank spaces under planets so kids can write weekly facts.

Materials Needed

  • Large wall chalkboard
  • Colored pastel chalk set
  • White chalk marker for text labels

18. Whimsical Fairytale Castle Wall

Introduction

Transform a playroom or bedroom corner into a fairytale kingdom featuring towering castle spires, stone arches, and soaring dragons.

What This Idea Means

A imaginative storybook illustration that adds depth, wonder, and interactive play possibilities to children’s spaces.

How to Make It

  • Draft Castle Silhouette: Draw tall vertical towers topped with triangular turrets, battlements, and arched gateways.
  • Add Stone Texture: Draw subtle brick patterns and stone textures along tower bases using fine grey or white chalk lines.
  • Draw Surrounding Landscape: Add rolling green hills, winding rivers, and fluffy clouds around the castle grounds.
  • Add Story Elements: Sketch flying dragons, banners on turrets, or starry night skies above the kingdom.

Tips and Variations

  • Draw full-scale doorways children can stand next to for fun imaginative play.
  • Keep silhouettes simple so kids can color inside the chalk outlines themselves.

Materials Needed

  • Full wall chalkboard surface
  • Assorted colored chalk sticks
  • Sponge and detail brushes

19. Under the Sea Aquatic Reef

Introduction

Dive into an underwater world filled with coral reefs, sea turtles, swimming fish, and shimmering light rays filtering down through ocean water.

What This Idea Means

A rich, immersive marine landscape using cool blue gradients, layered coral textures, and fluid aquatic movement.

How to Make It

  • Blend Water Background: Smudge rich cyan, navy, and turquoise chalk horizontally across the board to create an ocean depth gradient.
  • Add Sun Beams: Draw soft diagonal white strokes coming from the top corner, smudging them downward to mimic sunlight filtering through water.
  • Build Coral Base: Draw sea anemones, brain coral, and tall kelp fronds along the bottom border in bright pink, yellow, and green.
  • Populate Sea Life: Sketch sea turtles, jellyfish with trailing tentacles, and schools of small tropical fish swimming through the mid-ground.

Tips and Variations

  • Keep jellyfish soft and semi-translucent by smudging white chalk lightly with fingertips.
  • Great for bathrooms, pool houses, or kids’ marine play corners.

Materials Needed

  • Large black chalk canvas
  • Ocean pastel set (blues, greens, pinks, yellow)
  • Blending sponges

20. Cozy Winter Cabin & Snowscape

Introduction

Capture the magical peace of a winter wonderland with a glowing log cabin nestled among snow-dusted evergreen trees under a starry winter sky.

What This Idea Means

A moody landscape piece utilizing heavy white chalk highlights against dark backgrounds to portray cold snow surfaces, warm glowing windows, and crisp winter air.

How to Make It

  • Background Trees: Draw layered silhouettes of evergreen pine trees along a mountain ridge line.
  • Construct Cabin: Draw a cozy log cabin in the mid-ground, complete with a stone chimney and roof heavily covered in snow.
  • Create Warm Light: Fill the cabin windows with bright yellow and orange chalk, smudging a soft yellow glow onto the surrounding snow.
  • Add Falling Snow: Dot white chalk across the entire sky and tree branches to create a falling snowflake effect.

Tips and Variations

  • Add a curling trail of white chalk smoke rising peacefully from the chimney into the night sky.
  • Perfect seasonal decor transformation for living room fireplaces during holiday months.

Materials Needed

  • Framed black chalkboard
  • White, yellow, and dark grey chalk sticks
  • Cotton swabs for light glowing effects